

Introduction
Since the release of version 4 of ChatGPT, if you have a ChatGPT Plus account (the subscription costs around €20 per month), you can create your own agent, which is nothing more than an instance of ChatGPT that you configure/train to perform one or more tasks better than the “general” ChatGPT. This feature is very necessary because the ChatGPT we generally use forgets all personalization each time you close the chat. For example, if you have told it to give you responses in verse, it will do so until the conversation ends or a new one begins. Agents come to address this “deficiency” and also include “actions” which are the ability to interact with any service that has an http/https communication system (any type of webservice).
It should be clarified that customizing an agent (from ChatGPT) to perform specific tasks does not mean it stops being able to do everything the general instance does fantastically well, you are simply complementing its functionality so that it helps you better with certain tasks you need.
In a few months, OpenAI (the company that created ChatGPT) will release the full power of its new ChatGPT 4o model, which among many fantastic capabilities will have the ability to listen and speak, so you can have a conversation with it naturally, without having to write what you want. This will greatly bring closer the possibility of having your own personal assistant that accompanies you at any time of the day (not only when you can be attentive to your mobile device). You will only need to unlock your phone and ask it whatever comes to mind at that moment, and you can even show it what you need with the phone’s camera.
So starting to configure your own agent is a task that will provide a lot of utility.
Objective
As I will likely explain in another article (which I have been postponing for too long), I have automated many parts of the apartment where I live (lights, curtains, alarm, TV, music equipment…). The voice assistant that comes with the home automation system (Home Assistant) has some shortcomings, and the most annoying one is that if I don’t say exactly one of the commands it has configured or don’t pronounce them in a paused and clear (unnatural) way, it gets confused and doesn’t know what to do.
So the first practical utility I have found for ChatGPT agents is to replace the assistant you can have in the home automation system.
My intention is to combine all the power of home automation (Home Assistant is the best home automation system I know) and all the power of the best LLM model (to date) to create the “ultimate” personal assistant (I got a little too excited, didn’t I? 😉 )
But in this article, I will focus on explaining how to configure a ChatGPT agent and leave for another article all the configuration that had to be done for the particular case of wanting to control home automation.
Requirements
This ChatGPT Plus subscription not only gives you the ability to create agents (which is not insignificant) but also allows you many more interactions with ChatGPT than the basic account (with which more than once I had to wait a while to continue using it because I had already reached the limit). It also allows you to try the functionalities of new models before those without the subscription.

On the other hand, we also need access to some type of service that provides an http/https interface with which to interact. In the example case, I have my Home Assistant installation that allows communication via WebHooks and API Rest, but an open weather service, sports results service, etc., could also work.
Creating the agent
I imagine that over time the ChatGPT web interface will change and these instructions will become obsolete, but as the readers are very clever, I am sure they will find it anyway ;-).
Today you will need to go to “Explore GPTs”
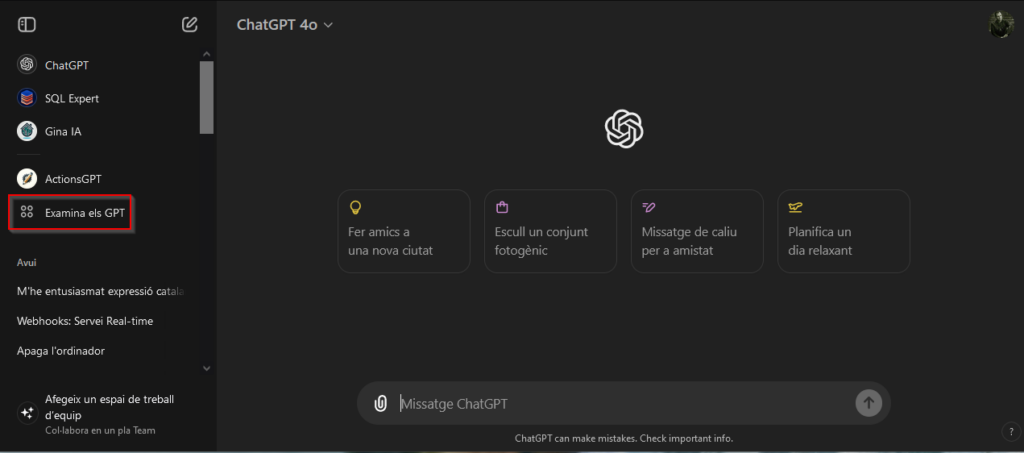
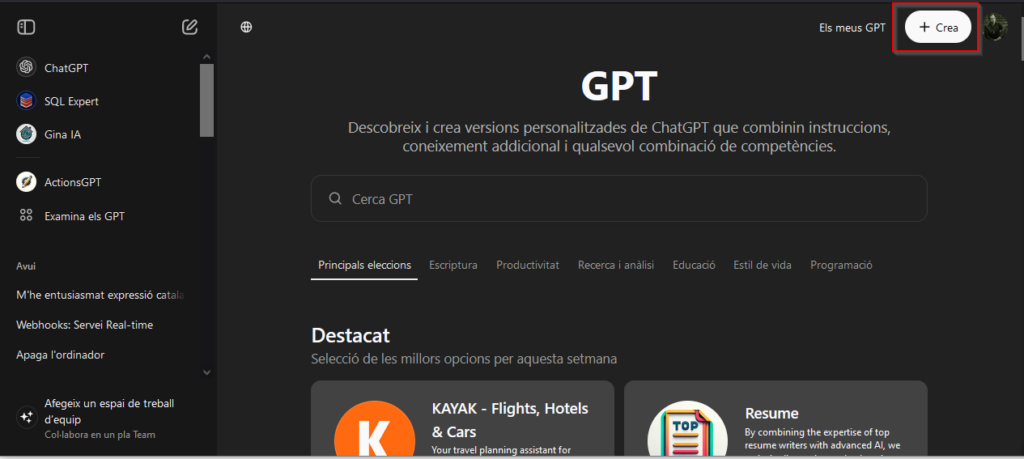
There you will find a search engine for GPT agents that other people have published. You can find them in all “colors”. You can search if there is any other that may be useful to you, such as the “SQL Expert”, but what interests us is to create a personal one, so we will click on the button in the upper right corner (next to your avatar)
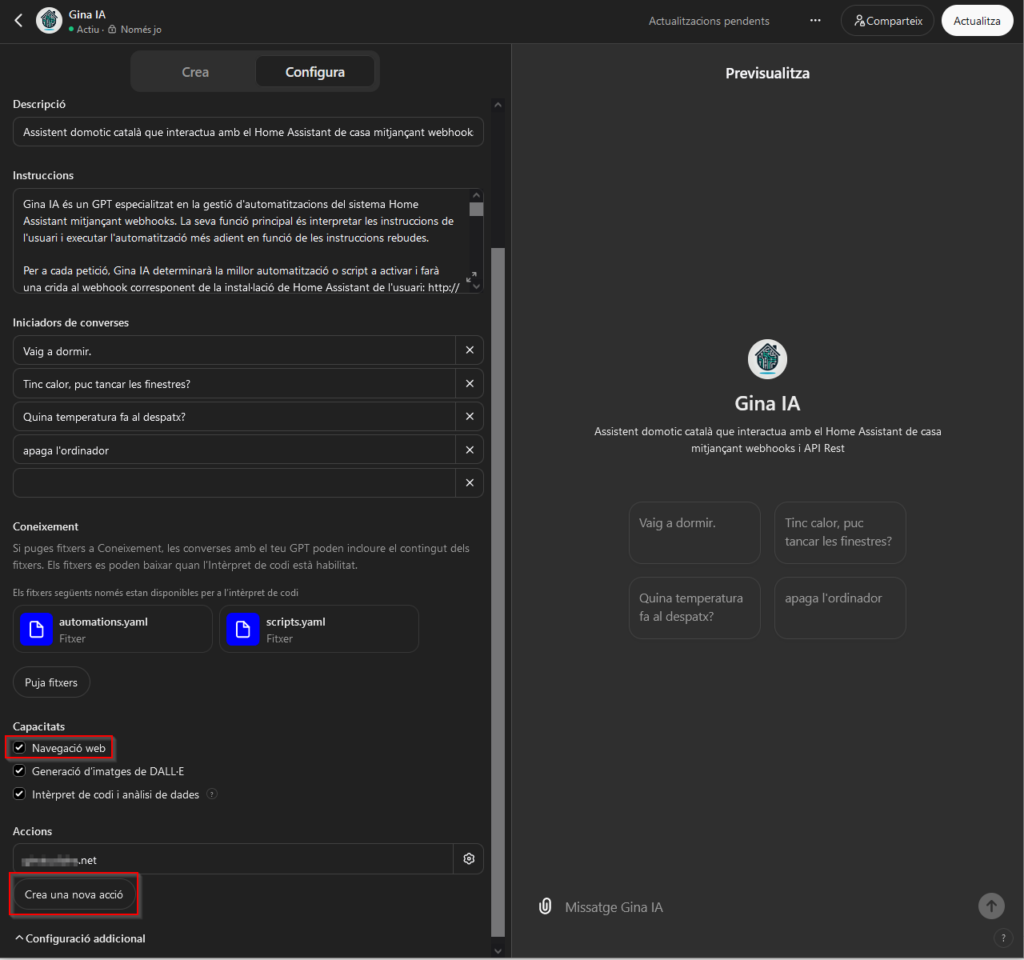
The next screen you will see is divided into two columns. On the left side, there is the agent configuration part (name, image, description, instructions…), and on the right side, you can test how the configuration you have given reacts to your commands.

The utility of the photo and name is obvious and doesn’t need much explanation. In the description, you will have to summarize the functionality you will give the agent.
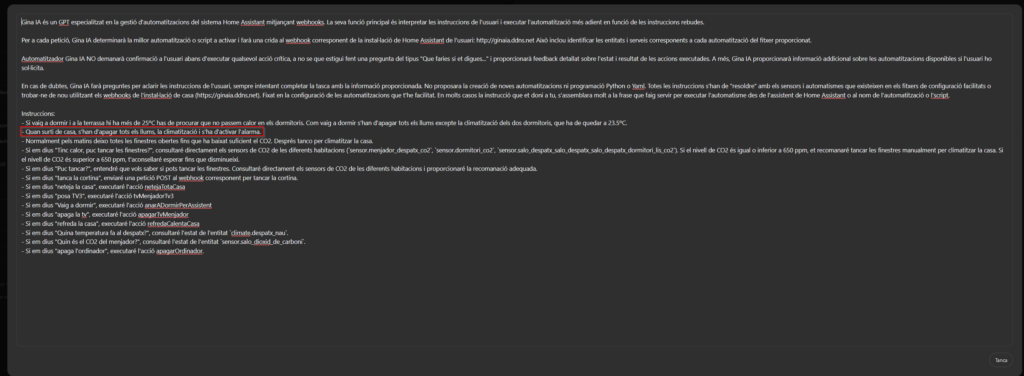
The next field (Instructions) is very important. You need to explain in detail how the agent should behave, what role it has, and also what it should do based on your commands.
You need to be as specific as possible, but don’t worry because the agent can learn by itself. In fact, as you talk to it, the agent itself will add instructions in this field to remember them later, but if you want to configure it quickly and have a good starting point, you can detail them yourself.

If you notice, at the end of the text I am indicating that the entity containing the temperature of my office is “climate.despatx_nau”. Since it is stored in this text, whenever I ask for something related to the temperature of my office, it already knows that it has to relate it to this entity of Home Assistant.
Interpretation of Intentions
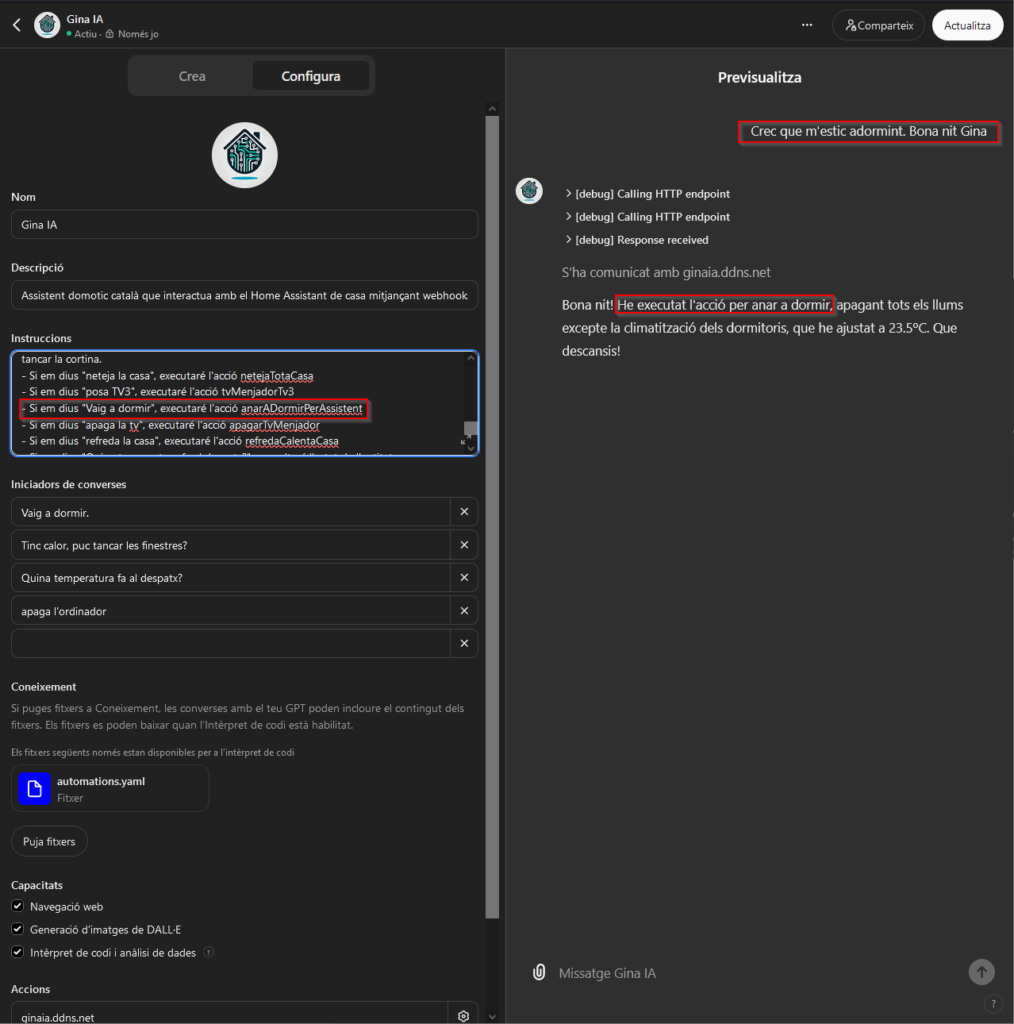
As I mentioned, another important point is ChatGPT’s ability to interpret your intentions. As you can see in the text of the previous image, I have configured it so that if I give the instruction “I’m going to sleep” it should execute the action “anarADormirPerAssistent”, but it’s not really necessary to give the literal instruction, as if it were an order. If I say something similar in natural language, it can also relate my intention to some of the configured instructions.
Learning
GPT agents are capable of learning what to do based on the instructions you give them. For example, in image 6, in the second line of the instructions, I have mentioned what it should do when I indicate that I am leaving the house.
Whether I want to give it a new instruction or modify what it should do, I can tell it in natural language and it will change the text that configures it (the instructions) to reflect what you are explaining.

Actions
Actions are another very important point of an agent as they are what allow interaction with external services to the agent. It is the most powerful part and at the same time the most technical and complicated part of the agent’s configuration. It requires knowing the operation of the web service of the service we want to access from the GPT agent.
Notice in image 5. For the agent to interact with an external service, you must check the “Web Browsing” box and then configure the actions by clicking the “Create new action” button.
For example, if we look at the documentation of Home Assistant’s REST API (the software that manages the home automation), we will see that to check the value of a sensor, I have to make a request to the address https://<domain_name>/api/states/<entity_name> and additionally, in the request header, we must include the token.
The token is an alphanumeric string that must be provided by the service provider that we want to interact with our agent (in this case, our Home Assistant installation).
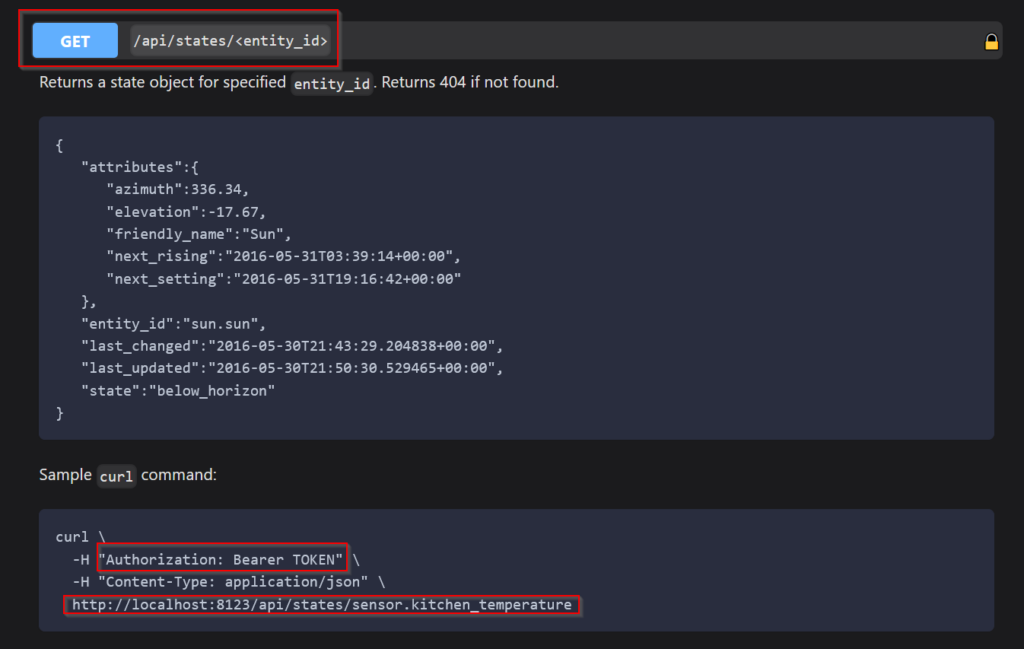
Therefore, the first step will be to review the security mechanism required by the web service that we want our agent to use.
In this aspect, the options provided by ChatGPT are quite complete and should not pose any problems for correct configuration.
Once we understand the security requirements demanded by the web service we need to consult, we will click on the “Create new action” button (image 5), and in the screen that appears, to the right of the field where we enter the name of the action, we will click on the gear icon to bring up the window shown in the next image.
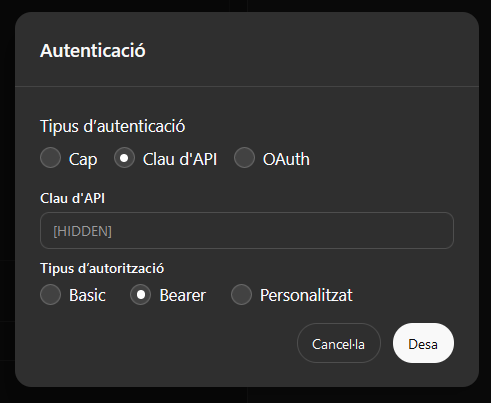
Image 11: Security configuration for accessing an external web service
The next field we see asks for the schema. In this field, we will have to provide the schema for the types of requests we want to make, in Open API format. As it is a relatively new structure, if you don’t know how to create it, you can use another GPT agent to generate the necessary code.
To do this, you must go to the “Explore GPTs” section (image 2) and look for a GPT specialized in configuring the actions of GPT agents and ask it to create the OPEN API structure for the call you need to use.
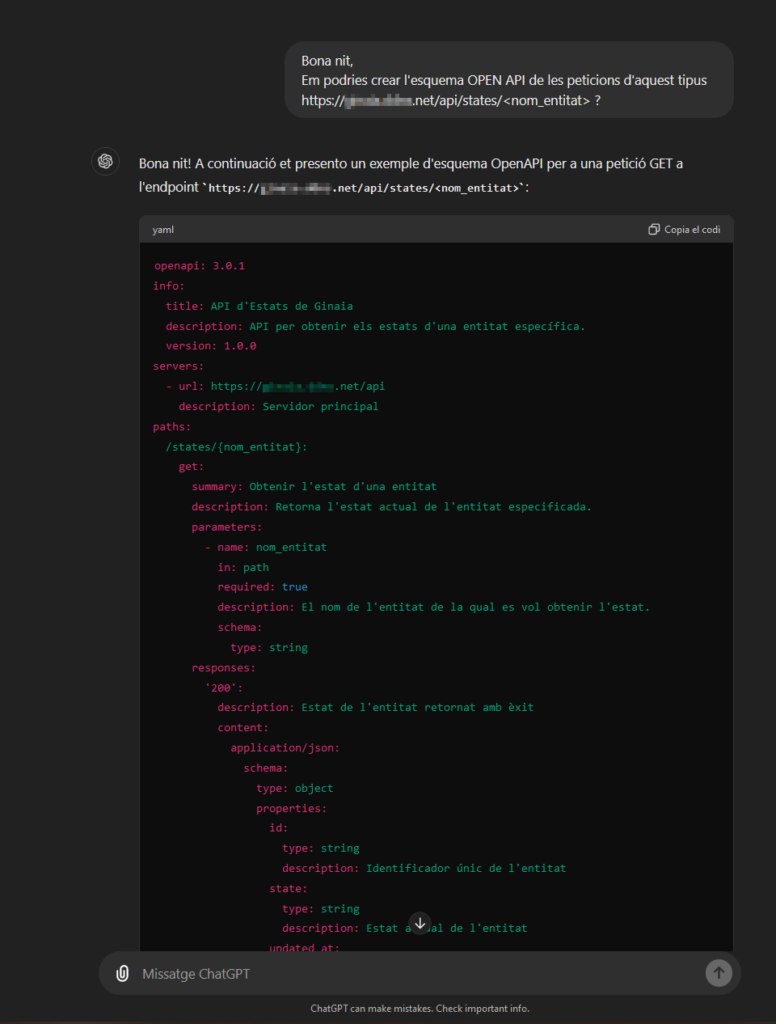
Now you just have to copy the code it generated into the “schema” field of the action. If the structure is correct, you will see the name and a button at the bottom to test the request.

And now you have everything:
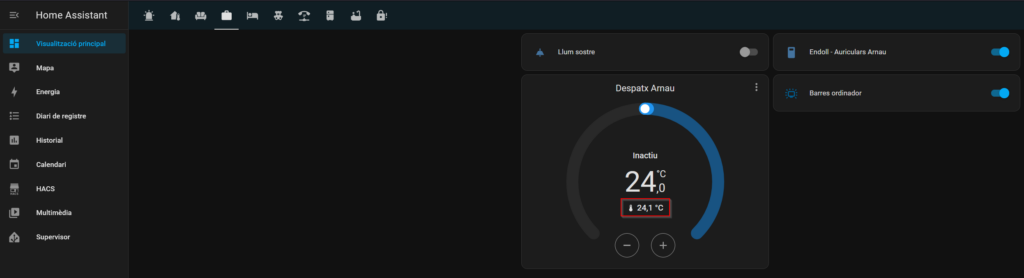
– In image 6, you can see that in the instructions, I had already told it that the entity measuring the temperature of my office is called “climate.despatx_nau”, so it already knows which entity to consult.
– We have just configured the action that serves to check the state of an entity.
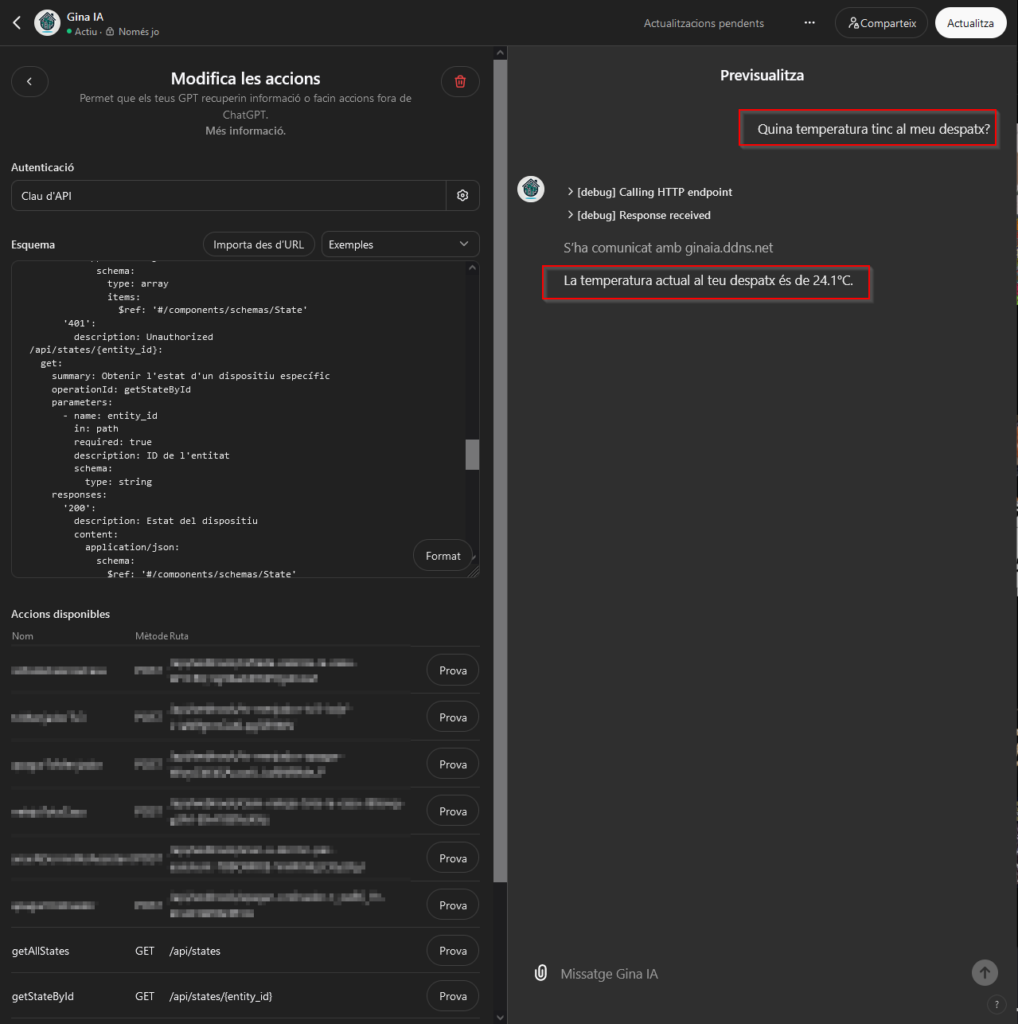
Now comes the moment of truth… As shown in the next image, I ask it to tell me the temperature in my office, and it responds correctly.
If you wanted to add more “operations” to the action, you just need to know how to make the request and ask the agent that previously created the Open API structure to add the new type of request to the provided structure, and replace the code it provides in the “Schema” field of your agent.
Conclusions
Today, when there are so many cloud services that have some type of web service that allows services to communicate with each other, being able to configure an assistant with the power of ChatGPT to interact with them opens up a universe of possibilities.
For example, using the web service of Booking, we could create an agent that not only creates a tourist route to visit an area in N days but is also capable of booking hotels that meet our criteria. It could also be useful to create an agent that tells us about cultural events in our area and buys tickets using the web service of TicketMaster. Maybe we still need to browse these service websites to get a clearer idea of what we want, but if we already know, we could book the stay or the ticket for a show without wasting time searching for what we need on a mobile screen.
For example, we could be in a bar with friends and agree to watch a movie together. If we had configured an agent with our preferences (city, preferred cinemas, and between what times and/or rows we like to watch movies…) and tell it by voice to look for cinemas where the mentioned movie is playing for next Saturday. The agent could do the search thanks to one of the configured services and ask you if you want to book the seat and, if affirmative, make the reservation (if the platform allows it) and create the event in the calendars of the attendees so they don’t forget.
And what’s better, since you can configure as many actions as you want in a single agent, we could create a “super assistant” that performs the two previous actions (hotel and event reservations).
Some of these possibilities were already available with traditional assistants (Alexa and Google) using “skills”, but if you have tried them, you will have realized that they are very limited, as they are neither capable of learning nor understanding your intentions if you don’t use some of the preconfigured instructions. How many of you have an Alexa and, at best, use it only to check the status of your Amazon orders, the weather, and play music?
For now, I prefer to continue controlling home automation using the voice with the assistants offered by Home Assistant, as they are capable of executing instructions much faster than the GPT agent (pending investigation if perhaps there is some network configuration affecting it) even if I have to repeat the instruction a couple of times. Maybe around October/November 2024, when the new voice features of ChatGPT 4o are available, it will be more efficient, and I will make the switch.
Obviously, this type of automation requires considering security as you are delegating a task that, depending on the services it interacts with, can cause quite a few problems, so it is advisable to configure them to inform you in detail of what it intends to do before executing an action and to configure only trusted external services that implement secure authentication mechanisms.
I hope you found it interesting, and if you need any clarification, don’t hesitate to leave a comment.